The British Don’t Take the Bait
Location
Other maps: Bing, Google, MapQuest.
Coordinates: 36.0350, -79.5269.
Type: Stop
Tour: Regulators
County: Alamance
Full
The coordinates take you to a set of markers on the grounds of Lake Mackintosh Park & Marina—check its hours before you go. After entering the grounds, take the first right, at the small sign saying “Clapp’s Mill Historic Site.” This leads to a circular parking lot.
Park, and walk past the picnic shelter at the far end of the lot from its entrance. Go to the lake edge somewhere between the shelter and the clubhouse on the right.
If you want to remain in your vehicle, try to park where you can see to the left of the clubhouse across the water running behind it.
Context
After the British chased the Continental Army of Maj. Gen. Nathanael Greene through North Carolina to Virginia in the Race to the Dan, in early 1781, Greene returned to confront the Redcoats.
Situation
Patriots
For a time Greene moved his army frequently, delaying battle until he could gather more part-time “militia” soldiers. A “Light Corps” under Col. Otho Williams, built for rapid movement, was screening him from the British.
British
While searching for Greene, the army of Lt. Gen. Lord Charles Cornwallis had camped between Buffalo Creek south of here (to your right as you drove in) and the Alamance battlefield from the Regulator War of ten years earlier.
Date
Friday, March 2, 1781.
Timeline
Imagine the Scene
A March to a Standoff
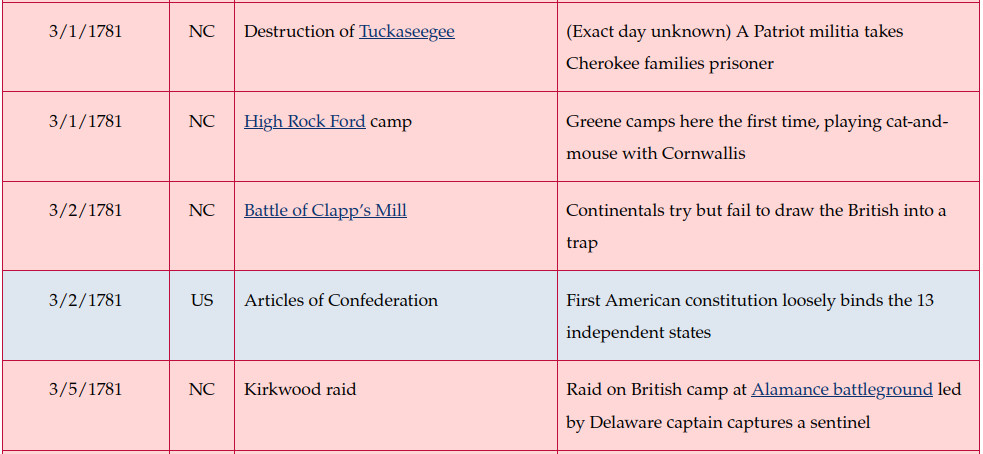
Local historians using deeds and eyewitness accounts, including the unedited original of Col. Joseph Graham, tell a different story of this battle from that in most modern sources.1 We relay that story. Most details come from one source, Graham, writing 46 years later, so believe those with caution.
Look back toward the marina and main part of the lake.
In 1781, you see a valley to your right, at the bottom of which runs Big Alamance Creek. Ravines with small feeder streams are in front of and behind you. Williams is camped on the far side of the creek somewhere in the direction you are looking. Most sources claim the Patriots or “Whigs” are planning an ambush, but it’s more accurate to say they are trying to draw the British into open battle.2

Williams does not know exactly where the Redcoats are, but his force hears the morning drums of their camp. He sends a detachment of Continental and militia soldiers under Lt. Col. Henry Lee this way. It crosses the creek, probably using a ford on the other side of today’s Huffman Mill Road bridge. The troops break into separate lines as soon as they cross. They come this way using a road likely running to your right, somewhere below the modern marina and picnic shelter.
Turn around and look across the small arm of the lake that curls behind the clubhouse.
The road drops into the ravine in front of you and climbs up the slope on the far side, between the widest part of the water and today’s clubhouse. First to pass you are a few Catawba warriors and some militia riflemen on each side of the road. Next comes Lee, by himself, riding about 100 yards behind. Another 60 yards behind him, 20 of his Continental cavalry and 20 more riflemen pass around you. A similar unit under Graham is on the other side of the road. Finally 200 Delaware and Maryland Continental soldiers march below and by you in a third line, with Williams.

The story of the battle is told at our next stop. Turn around and face the marina again.
After the battle, the Patriots withdraw and form into a line, probably along the modern marina road, as that would have been high ground above what Graham called a “hollow” between here and the marina. Less than an hour after the firing started, the British halt either on the edge of the ridge behind you or along here. For 20 minutes the two sides stare at each other, no one shooting. Then the Patriots march back to the ford—across which the rest of the Light Corps is waiting! The Patriot force holds there a half hour, hoping the Redcoats will follow, before Williams orders them to withdraw.
A circle of markers about the battle, and stones from Clapp’s Mill, are on the far end of the parking lot. To visit, continue most of the way around. A short sidewalk by the stones takes you to the circle (not the one below the markers).
The View from the Third Line
Drive to 36.0284, -79.5262:
- At the marina exit, turn left onto Huffman Mill Road.
- Take the second left, Pond Road, near the bottom of the hill, which angles back toward you.
- Continue as the road climbs and curves gently, and then slow down at the sharper left turn where it begins to drop.
- Past the woods on the right, pull onto the shoulder just before the first driveway, for 4150 Pond Road.
The 1781 road crosses the modern one somewhere in front of you. The first two lines of Patriots, and Lee, pass by you again, moving left to right.
Within your view downhill to the right, farm fields begin, the road turning into a lane between them. A well is by the near end of the one on the right. In the distance, to the left of the lane, is a barn with an opening in the middle wide enough for wagons to pull through. Beyond it, the road runs out of your sight and through woods 100 to 200 yards before taking a sharp turn left and dropping down to Buffalo Creek. To its right on the creek flat is the small plantation of Phillip Foust. A grain mill is near the creek by the road.

“‘On entering this wood all was silent,’” Graham reports. Then one of the Catawba “‘on the road made a noise like a deer snorting.’” The first line runs up to the trees and fires a volley: The British are in the trees! They had set an ambush, but the Catawba smelled them out, perhaps preventing a Whig catastrophe.

A Loyalist unit gathering food for the army had spotted the Patriot forces and rushed back to notify their camp. Lt. Col. Banastre Tarleton informed Cornwallis and led a force this way to investigate.
The riflemen of the second line join the first in the woods, and all begin shooting at the Redcoats. Most of the mounted men dismount and tie off their horses, while Lee’s cavalrymen take cover behind the barn: This is not where they want to fight.
On the barn’s far side fences run up to the road on each side. Graham and his men on the left side, and the similar unit on this one, march at 45-degree angles around the outside ends. Graham’s sketch of the battlefield shows most of the woods on his side cleared for a field his men use in going around the fence. Both units continue past the first line in the trees. They don’t see the Redcoats until they are within 70 steps.
Tarleton writes later he deployed 150 infantry to the Patriot’s right side and center, while his fearsome British Legion cavalry hung back in reserve to cover Graham’s end. Both sides begin heavy firing, at which point the Catawba withdraw. Graham writes that “the saplings and bushes were so thick the bark and twigs were continually flying (and) hit men on the cheeks (and) shoulders or kept them dodging.” This also slows reloading. After the Patriots fire about three rounds, the Redcoat infantry charges and Tarleton’s dragoons attack Graham. The militia take off toward you.
Lee’s cavalry moves out from behind the barn into the road, but do not engage, heading this way instead. Lee reminds Graham to watch the gap in the fence and moves back along the road as well, at a lazy pace that impresses Graham. Graham has his men turn in their line within the woods to cover the fence gap and protect the retreat. Then they fall back while the riflemen cover them, and finally those break off. Tarleton’s horsemen have trouble pursuing, given the trees, fences, and hillier terrain of the time.
The Continental soldiers are likely here, along this ridgeline. They begin firing over the heads of the retreating militia. Williams orders those men to join them. But each time his officers get a few into the line and move on to gather others, the earlier group takes off. British musket balls are whizzing by you. They’re coming too far to do much damage. But Col. Joseph Dickson says to Williams, “‘You may depend upon it, you will never get these men to form here while the Enemy is firing yonder. If you will direct them to form on the next rise beyond that hollow 100 yards back, they will form there.’”

That description aligns with the height the marina is on now. Williams gives the order, and the plan works. The militia are joined by the Continentals there, as described at our first stop.
Tarleton has taken some prisoners, who tell him—falsely—that Greene and the rest of his army are headed this way. He withdraws his men past you, has them bury their dead in a mass grave on Foust’s plantation (location unknown), and they retire to the British camp.
The British Approach
The closest public view of the mill site (without a boat) is also the view the British forces had as they approached Buffalo Creek. To see it, drive to the entrance of our next tour stop, the Alamance battlefield (36.0093, -79.5199) and:
- Go past the entrance to the second street on the left, Porter Sharpe Road.
- Turn left, drive to the dead end, and pull into the turnaround on the left.
The road points at the mill site. Remains of the mill dam were photographed there before the lake filled in. The dam blocked a small stream on the far side where it emptied into the creek, creating a mill pond.

Casualties
- British: 16–20 killed, 30 wounded.
- Continental/Militia: 8 killed, 3 wounded, 7 captured.3
Historical Tidbit
This battle is misnamed. A mill somewhere on Buffalo Creek was built around 1763 and bought by Foust the next year. So that was “Foust’s Mill” during the battle. Foust sold a mill in 1788, and the buyer sold it to Barney Clapp six years later, but that could have been up- or downstream. Records don’t make clear it was the same mill by the road Graham labeled as “Clapp’s Mill” on his map decades later. He rode down the road and across the creek the day after the battle, checking on the British, and later spoke to a “Mr. Clapp.”
Williams called this the “Skirmish on the Alamance.”4 But a more accurate name, given the number of casualties, might be the “Battle of Foust’s Farm!”
More Information
- ‘Battle of Clapp’s Mill’, n.d. <http://steveclapp.com/places/ClappMill.htm> [accessed 26 December 2019]
- ‘Battle of Clapp’s Mill Historical Marker’, n.d. <https://www.hmdb.org/m.asp?m=28062> [accessed 26 December 2019]
- Bright, Jeffrey, and Stewart Dunaway, Clapp’s Mill : The Battle on Foust’s Plantation (Lulu.com, 2013), May Memorial Library, Local History <https://alamance.tlcdelivers.com/?config=pacdefault#section=resource&resourceid=179261588¤tIndex=0&view=fullDetailsDetailsTab> [accessed 2 May 2025]
- Bright, Jeffrey G, and Stewart E Dunaway, Like a Bear with His Stern in a Corner: The NC Campaign During the American Revolution (Lulu.com, n.d.), Wilson Library, University of North Carolina at Chapel Hill
- Graham, Joseph, ‘Joseph Graham (1759-1836) Papers’, Lincoln [Co.], N.C., 1827, State Archives of North Carolina, PC.60
- Graham, Joseph, Sketch of the Ground and the Position of the British and Americans at the Battle near Clapp’s Mill Fought on the 1st Day of March 1781, n.d., State Archives of North Carolina, P.C. 60.1-2: Joseph Graham Papers 1780-1836, ‘Articles: August 6, 1780-March 10, 1781’
- Lewis, J.D., ‘Clapp’s Mill’, The American Revolution in North Carolina, 2011 <https://www.carolana.com/NC/Revolution/revolution_clapps_mill_1.html> [accessed 26 December 2019]
- ‘Map of Alamance County, North Carolina (William Luther Spoon) :: North Carolina Maps’, n.d. <https://dc.lib.unc.edu/cdm/ref/collection/ncmaps/id/259> [accessed 12 April 2025]
- ‘Marker: G-111’, North Carolina Highway Historical Marker Program, n.d. <http://www.ncmarkers.com/Markers.aspx?MarkerId=G-111> [accessed 25 June 2020]
- ‘Satellite Image of Clapp’s Mill Area’, n.d. <https://services.arcgis.com/NuWFvHYDMVmmxMeM/arcgis/rest/services/DIL_1980_Low/FeatureServer/0/2633/attachments/2633> [accessed 12 April 2025]
-
Sherman, Wm. Thomas, Calendar and Record of the Revolutionary War in the South: 1780-1781, Tenth Edition (Gun Jones Publishing, 2007)
- Steele, Jr., Rollin M., The Lost Battle of the Alamance, Also Known as the Battle of Clapp’s Mill (Powell Enterprises, 1995), Rockingham County Public Library
1 Steele (1995), and Bright and Dunaway (2013) based on Steele and extensive deed and map research.
2 Based on messages between Williams and Greene reported in Steele, and subsequent troop movements.
3 Graham states in his papers that Williams wrote three Patriots were killed. But during Graham’s ride over the battleground the next day, he “got the inhabitants to Bury 8 of our men (all militia, 2 of my company).”
4 Graham Papers.
← Pyle’s Defeat | Regulators Tour | Alamance →


